Thursday, 26 February 2009
Problem solved
First I drew a sketch on a piece of paper, traced it to the aluminium and then sawed it out. Filed and polished it and this it what I came up with.From the side:
And mocked up. I will use A4 Stainless steel Allen bolts for this. All bolts that will be replaced will be A4 as I don´t like rust and the store where I buy it is extremely good, not cheap but they have ALL sizes.
My starter cover got polished as I wrote previously. The previous owner sprayed it with some silver metallic paint that wasn´t so good anymore. Some surface rust had come up as you see here:
Not a pretty sight. This is much better. Elbow grease and a drilling machine with two different wheels and compound.
I can´t leave you with just this. If you wondered where I got the idea for the rear fender bracket from, I must say Flake. I think mine came out better...
Wednesday, 25 February 2009
Dirt tracker
Checking for kick ass bikes even more so.
Now this is a first for me, a Harley that I actually like a lot, kicks ass and makes me wanna call the bank (oh, you don´t lend out money for bikes anymore!!???).
It´s a Harley XR750 replica.
Look at the details and the fantastic rims!!!
I wonder where Deus Ex Machina got their inspiration from...
You can order one of these yourself. Will set you back about $27000.
Here are the specs:
1200 Buell XB motor 105 hp
19″ PM racing wheels
Custom Oil in frame , single shock chrome moly racing chassis
PM brakes front and rear
PM controls
Aluminum fuel tank
Custom paint and graphics signed by Jay himself
Supertrapp exhaust
Flanders bars
Custom “9″ imprinted seat
Aluminum pegs
Penske shock
Headlight and tailight
a street legal race bike!
Options Available:
Wire Spoke Racing Wheels
Color Choice of “Harley Orange” or
Blue / White “Supertrapp” race colors or
Burgundy/White “Bartells race colors
Nickel or Chrome or Painted frame
Buy it here
That seat pan would be great on my bike, might just buy one.
Just minor work on my bike. Got rid of the ugly part with the reflexes that was on the fork, and also flipped the brackets that holds the head light. Got the light a bit lower which looks better.
Since my budget is a laugh, I need to be smart rather than a shopaholic. But that seat pan is to difficult to make myself.
Until later.
Monday, 23 February 2009
That f**king low look
How do you go about it?
You either buy shorter forks or if you want to play around yourself, you lower them internally.
As always, use your head and good tools. I do NOT want to be responsible for any accidents.
You are responsible for your life, your hacks and your ride.
Nuff said about that, here is Justins way of doing it. From what I´m told, a very good way of doing it actually. All explained with pictures and enough words that even I got the message. Thanks mate.
If you want to get some ideas, ask some questions or just hang out, go to The Chopper Underground. Great forum and lots of people with enough experience to teach you whatever you want to know. Register and use the search function.
See the bikes in previous post for inspiration.
I just polished the starter cover. It was painted silver and was deteriorating and looked generally crappy. Pics will come.
Saturday, 21 February 2009
Serious hacking
So how do you get the bike lined up, all angles right and the looks as well?
Follow this link and you will end up at Back Street Choppers. They have some good pics and tricks on how you go about it. Also while doing it you must extend the swing arm to get the proportions right. Here you do need to remember my devise: Measure twice - cut once.
Just remember that some bikes looks like shit if you get the proportions wrong.
This bike is about 10cm (4") to short, also it uses the swing arm as a rigid and that stresses the bearings to much.
Could work for Asian midgets (sorry, little people), but it looks just plain wrong on normal seized Westerners. It´s a Suzuki GS450. I´m sure it´s a fun bike and that it has a proud owner.
This bike has the proportions right. It´s an Yamaha XS650. My guess stretched about 15cm from original. I´m talking moderate stretch here, not OCC stretch.
If you don´t want to go rigid, save your back/ass, an still have a stretched bike, extending or swapping your swing arm is the route.
Look at Matsumaru Store, they have done just that, really beautiful bikes.
This bike is lowered 10cm in front and swing arm extended 5cm.
10cm lowered in front, rear 5cm longer as the one above.
This bike is 9,5 cm lowered in front, swing arm 3 cm longer.
For the back yard mechanic, more hands-on tricks. Rust is the enemy on old bikes. Have you tried electrolysis? Ken has some practical ideas if you have a rusty tank.
Some people swear by citric acid, but I have not tried any of these tricks as the only rust on my bike was easy to remove, or in the case of engine bolts, they were exchanged for A4 stainless steel Allen bolts. That improves the look a lot and is practical too.
Keep chopping (or Bobbing rather).
Friday, 20 February 2009
Going through the links
The bike is out in the cold and has to wait for a while as I need to figure out the seat and rear fender mount issue. Things are leaning towards a street tracker seat pan as I could raise it slightly to keep the original airbox that stick up about 1 cm above the frame. I plan to hinge the seat pan so I could easy access the air filter. Then I could bolt the rear fender to the seat pan as well.
You will be updated later.
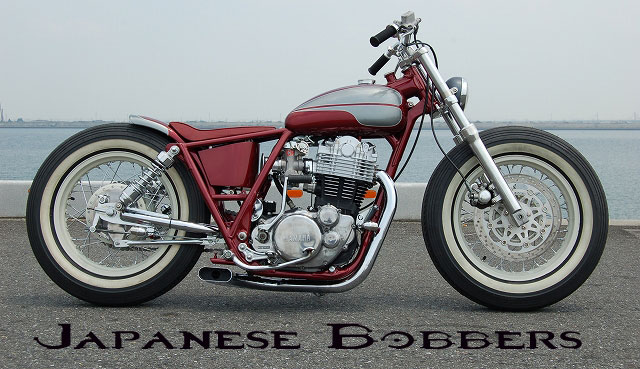
A while ago I found another Japanese manufacturer of custom bikes.
An Bu is the name and you can find 5 pages of their bikes at their slightly crappy website.
If white wall tires are the thing that you believe would pop your bike. Beck makes them and
Coker Tires is the place to go to either to check them out or to order.
Using white wall almost demands red rims. Look at this Triumph Bobber and you must admit it looks fantastic. That engine looks so incredibly good as well, but I´d rather have a Yamaha XS650 for reliability.
Otherwise it seems like when you put looks before anything else, the choice is
Firestone Deluxe Classic Blackwell Tire. One of the coolest tires of all times.
I´d love a set of these, but they might be hard to get in Sweden. I have not been successful in finding a retailer here. Any tips are welcome.
Some people are a bit reluctant to the grip area when cornering but the pattern is awesome.
Brat Style uses this tire a lot.
The tires can make or brake the bike. Choose wisely either according to style or budget. No I am NOT sponsored by Coker antique and classic tires, but I´d love for that to happen. Nudge nudge, wink wink.
Don´t forget the poll in the upper right corner of this blog.
It has been two weeks since I added Google Analytics to this blog, and the numbers are surprising.
I´ve had 770 visits from 45countries. People from 43 states in the U.S represents about 50%, Canada, Sweden, U.K and Australia has about 30%.
30% of all visits are not new but returning visitors and you spend at least 10 minutes on my blog. Thank you all.
If you feel that I have missed something, please comment and I will add it if I feel it is valid.
Have a great weekend.
Monday, 16 February 2009
Measure twice - cut once.
Yeah, sounds to much like Paul Sr from OCC. Don´t like the bikes, don´t like the show.
This bike however, is very nice and obviously not from OCC.
Don´t know anything about it, just that I love the fork, head light mount and I believe it´s quite noisy.
This Street Tracker is from Deus ex machina, again, one of the best bike builders around. To bad it´s so damn far from Stockholm. A 24h flight is not around the corner precisely. Check the link on the right. All info about the bike there.
Nostalgia rules as far as bikes go.
This next bike is also from Deus. Lovely hardtail.
When you are done here, go check them out. Well worth the time.
If you are into street or flat trackers, Sideburn is the place to go. Link on the right as well.
Order the magazine if you like that a lot, but the blog is great as well.
As far as my bike goes, I have mounted the rear fender, put the stock rear shocks on and noticed that either they are:
- extremely soft
- worn out
- sags but work
The tail light will be on tomorrow and I will trim the front fender now a rear fender as well. Pics will come.
I did however hit a snag with my seat. I forgot to mount the lid/top of the airbox when I tried out the seat and now I discovered that the seat hits the plastic. Damn damn damn.
I need to make another seat that can cover the really high lid and I will cut out some from the seat pan so I don´t get the elevated seat look but a tight and smooth one.
You live and you learn. I should listen to myself. Measure twice, cut one.
Friday, 13 February 2009
Café racer - the details
And it is the details that distinguishes a nice bike from a beautiful one.
This Café racer is just beautiful. The finish is impeccable, the details well thought through and the pics ain´t bad either. It´s a Suzuki GS750, not the most common racer around. Well done.
I probably got the pics at GS Resources, link to be found on the right.
Battery is in the seat cowl.
Next is another Suzuki GS but a 550 instead. Also a very neat bike. Nice details but the pods are a bit off set, otherwise perfect.
The drilled holes again, I really have to do this some day. It looks so cool.
Even though I love some high dollar bikes, what really gets me going is to keep costs down and people having taste and ingenuity in oodles instead of big wallets.
I will leave you with an amazing shot.
That is with a hardtail as well. Never complain about a sore butt after seeing this picture.
Tuesday, 10 February 2009
K&N Magna Extra Wide Bar
The new one is, and here I am a bit confused, 32" wide, 4 1/2" rise and 6 3/4 pullback, it is a super bike bar but the measurements fit some of the flat track bars as well!!!
The bike got a totally different look and I sit so much better. I have to relocate my seat since I ended up much further back. I think I´ll make a new longer one tomorrow. I have another old road sign that just waits to be transformed.
This is what the bike ended up like with the new bar on it and the old on top so you can see the difference.
I need to get another throttle cable and a new front brake hose as well.
The throttle cable comes out from the tank now instead of between the forks.
The brake hose is just shy of 5 cm to short.
I´m thinking of getting some classic Triumph controls instead of the standard Suzuki ones.
That would look so much better. I also think I might relocate the master brake cylinder to some other place to get cleaner bars.
I also bought a bullet light that will be both rear and brake light.
It´s a Zodiac Bullet light, mostly for Harleys but I chose it before the Ford (STOP) light.
I can´t just leave you here with my bike.
Here is one of my all time favorites. It´s Kawasaki W650 from the Aussie guys at Deus Ex Machina.
Just look at it and enjoy. THAT is why they are on my links list. And look at the low bar as well.
Sunday, 8 February 2009
Fiddling
After fiddling with the clutch adjuster, they popped in fine when I moved the rear wheel a little.
In comes my daughter (age 6) and pushes some buttons randomly.
The bike tries to start!
She pushed just the right buttons and in the right order.
Luckily there was no gas in the carbs, so nothing happened apart from the engine turning.
It wouldn´t have been so bad if the bike hadn´t been in the kitchen...
Nuff said, here is a bike that I really love.
Low, fat, Triumph Thruxton from Gasmonkeysgarage. Just lovely .
Belongs to a guy from Greenday.
Thanks Ringadingdoo for the comments.
Visitors
Today, the topic is manuals, you know the last resort (or first if you are smart) we turn to if we have any question of what the hell we just did and how to do it correctly.
The people that follow the law will buy them from Amazon, the local bike shop or someplace else.
Other people I´ve heard about just download them from some place were the law is either lacking the will or the resources.
One place they visit is THIS PAGE.
Here you can find a manual for just any brand you might have at home.
If you need to look at parts to order, THIS page is fantastic. Pics from partsfiche, were you can see exactly how things were mounted before you tore it apart and misplaced the bolts and washers.
The devil is in the details, as you might know.
Here are a few neat details I like, what about you?
Look at the holes in the rear hub, looks damn cool. Beautiful bike all together.
I love the paint job on this bike.
Guys, if you like this blog, please comment.
Saturday, 7 February 2009
First mock-up of the bike
Will probably not use them later. If I rejet the carbs and get some pod filters, I will remount the electrical stuff under the seat and have that area open. The battery will be covered by some metal or a tin can.
The lower part of the bike shall either be black or shiny (crome or polished aluminium).
The struts are just for measurement. I need 25-27 cm shocks for the rear, eye to eye.
Does any of you have a spare pair for sale?
It sits sooo looow now.
Tomorrow I will buy some brackets for the rear fender. Would love to make a hugger but how the hell do I mount the front of the fender close to the battery?
Will buy some dirt track bars to replace the ones I have now.
Friday, 6 February 2009
Making the solo seat
The material used was:
1 old road sign
1 piece of high density foam mat - dad used it in the garden
Spray glue
Naugahyde - had an old piece at home
electric saw and drill
bolts, washers and nuts
electrical tape for the edges.
First I made the pattern on thin baking paper, I folded the paper in half to get it symmetrical.
I then transferred it to the road sign and cut it out with a saw, filed the edges and taped them with electrical tape. I also drilled the holes about 8 cm apart (3") and mounted screws, washers and bolts and super-glued them.
The pattern and foam before I cut out the shape.
Here you can see the cut in the sign and that I took 2 pieces of foam to cover the seat pan.
I cut it with a surgical knife. The foam is about 2cm (3/4") thick.
I then spray glued the foam and sign, let it wait for 1/2h and pressed them together, and added the second layer of foam, same process.
Then I made the rough form with the knife, finished with the drilling machine with some sand paper on it to make it smoooth.
Sprayed glue again on the foam and the naugahyde, let it set for another 30 min and the pressed the upper side to the foam, then the edges.
I then trimmed the naugahyde and spray glued the hyde and the sign again for final touch.
And from behind so one can see that it´s made from a sign, otherwise I would have glued another piece of naugahyde there for a super finish.
I hurried to mount the thing on the bike and I think it turned out just fine.
The bracket is just temporary as I couldn´t find any at the bike shop that fit to the tank mount. I don´t have a welder so I had to go another way around it.
Any comments?
Taillight
Here is a close-up of the light. It includes brackets for the license plate. It´s called Black beauty vintage light, and you can buy it here.$129.99 or 119.99 if you buy it on ebay.
If anyone has found similar taillights for less $$$ please comment on this.
Progress on my bike is coming along. I made a seat yesterday and it turned out really good.
Pics will come later. Made it from an old road sign as a seat pan.
Tuesday, 3 February 2009
New find
I found another maker of cool bikes in Japan.
Matsumaru is the name to remember. Loads of cool bikes here, all Bratstyle.
And another one.
Not a very creative day, but I need to think of how the hell I´m going to get that seat fastened without welding.
Sunday, 1 February 2009
This year it´s more to make it the way I want it, and next winter it will be tore down to the bones and the frame will be powder coated and all will be polished to perfection. Or it will be rough just with some shiny parts. Not decided yet.
The before. Cleaned but no polishing.
And after. A decent improvement but by no means finished. The pic was taken outside where there is -3C and some ice was on the covers.
Now I have made a paper shape of the seat. Will be similar to this.
I have found an old road sign of aluminium that will serve as base for the seat pan. I just need to figure out if I should buy the fastening stuff or make it. Rubber bushings seems better than springs since I will have the shocks for a while. I might even just bolt it to the frame to get it lower still. Springs are better if I go for struts of hard tail in the future. The seat above is from Boat Rap in Japan. They make some really neat bikes and awesome parts you can order as well.
Until later my friends.